Update: Starting with Windows 10 build 17661, Windows Defender was renamed to Windows Security. While this new approach makes it easier for users to access the built-in security suite, a lot of users have reported that the icon is totally useless for them. But what really annoyed a lot of users is the fact that the Windows Defender icon appears even if you are using a 3rd-party antivirus to protect your system. Luckily, you can dismiss the Windows Defender icon, but as you can expect, the procedure is not as straightforward as one would want. In fact, you can remove the Windows Defender icon without disabling its functionality. If you’re not using an external antivirus, Windows Defender will continue running in the background and will remain accessible via the classic path (Settings > System & Security > Windows Defender > Open Windows Defender).
How to Remove the Windows Defender Icon from Taskbar or Notification Tray
Since you can’t simply right-click on Windows Defender and close it to remove the notification, you’ll need to employ a different solution to hide or unhide the icon. Below you have a collection of methods that will enable you to hide the Windows Defender icon from the Notification Tray. We will also provide instructions on how to re-enable the icon in case you want it to return on your taskbar. Please follow whichever method seems more convenable to your particular situation.
Method 1: Removing the Windows Defender Icon via Task Manager
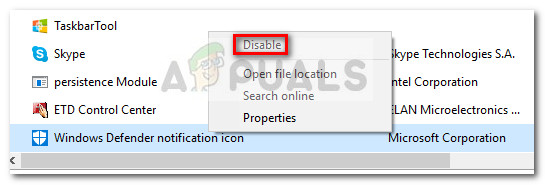
The most popular way to remove the Windows Defender Icon from the Notification Tray is via Task Manager. Since the tray icon is actually produced by an additional program that automatically launches during the startup phase, you can disable the autostart associated with it via Task Manager. Here’s a quick guide on how you can use Task Manager to remove the Windows Defender icon: Restoring the icon is just as easy. Simply return to the Startup tab of Task Manager, right-click on Windows Defender notification icon again and choose Enable. Don’t forget to restart the computer to enforce the changes.
Method 2: Removing the Windows Defender icon via Taskbar Settings
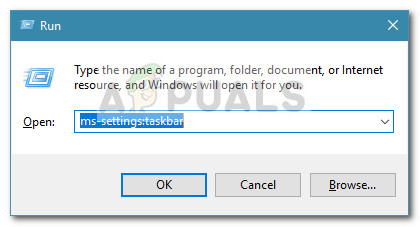
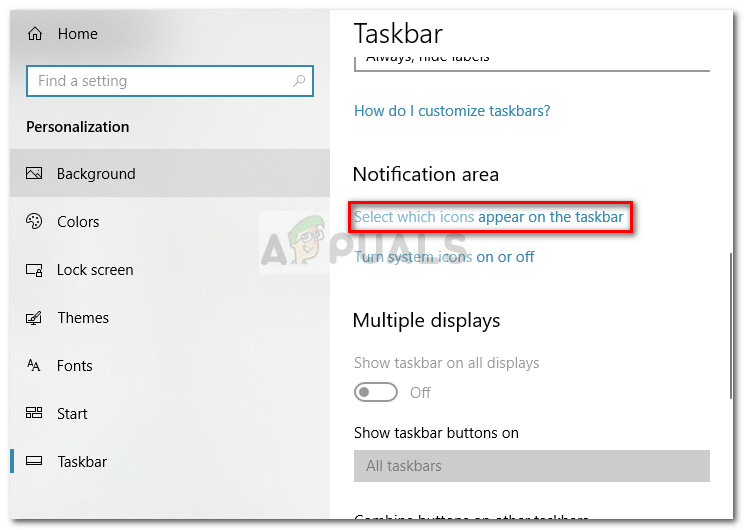
Another way in which you can hide or show the Windows Defender Notification Area (Windows Security) icon is via the Taskbar settings menu. This is the equivalent of using Method 1, but the difference is the change is made via the Windows 10 Settings menu rather than from Task Manager. Here’s a quick guide on how to remove the Windows Defender icon via Taskbar Settings:
Method 3: Disabling Windows Defender Icon via Startup menu
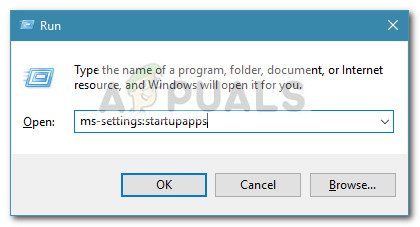
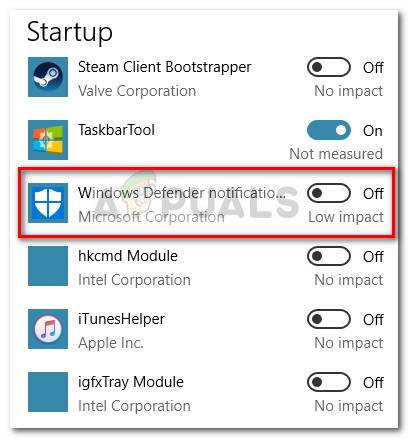
Another intuitive way of disabling the Windows Defender Notification Area Icon is via the Windows 10 Startup Tab (inside the Settings app). This will accomplish the same thing as the first two methods, just from a different menu. Here’s how you can disable the Windows Defender (Windows Security) icon via the Startup menu:
Method 4: Disabling the Windows Defender icon via Local Group Policy (if applicable)
Another way to go around dealing with the Windows Defender icon is to use the Local Group Policy Editor. But keep in mind that you’ll need to use an account with administrator privileges. Furthermore, this option is only available on Windows 10 build version 1803 and above. , Note: Only Enterprise, Education and Pro versions of Windows 10 will allow you to use the Local Group Policy Editor. Here’s a quick guide on disabling the Windows Defender icon using the Local Group Policy editor:
Method 5: Disabling Windows Defender icon from Registry Editor
One final method of disabling the Windows Defender icon is to use the Registry Editor. However, keep in mind that you will need to use an administrator account. Furthermore, the option is only available if you have Windows 10 build 1803 or older. Here’s a quick guide on how you can disable the Windows Defender icon from Registry Editor:
How To Remove ‘Get Windows 10’ Notification and Its Icon From The TaskbarHow to Add/Remove Home Group Icon in Windows 10Fix: Hide “Safely Remove USB” Icon from Windows 10How to Remove Padlock or Lock Icon from Files on Windows 10
